#TempDB optimization
Explore tagged Tumblr posts
Visit Tumblr Blog
Explore Tumblr blogs with no restrictions, modern design and the best experience.
Last Seen Tumblr Blogs


Fun Fact
Premium Tumblr themes are available from anywhere between $9 to $49.
Text
Troubleshooting TempDB Issues in Azure SQL Database
Azure SQL Database is a go-to for many due to its scalability and managed service offerings. Ensuring optimal performance hinges on properly managing the TempDB, a crucial system database that holds everything from temporary tables to caches for sorting. The TempDB’s size and performance are key to your database application’s speed and efficiency. TempDB and Core Count Explained There’s a…
View On WordPress
#Azure SQL Database performance#database scaling#T-SQL troubleshooting#TempDB configuration management#TempDB optimization
0 notes
Text
Checklist for performance tuning in MS SQL Server
Database & Server Configuration ✅ Ensure SQL Server is running on an optimized hardware setup.✅ Configure max server memory to avoid excessive OS paging.✅ Set max degree of parallelism (MAXDOP) based on CPU cores.✅ Optimize cost threshold for parallelism (default 5 is often too low).✅ Enable Instant File Initialization for faster data file growth.✅ Keep TempDB on fast storage & configure…
0 notes
Text
AX 2012 Interview Questions and Answers for Beginners and Experts

Microsoft Dynamics AX 2012 is a powerful ERP answer that facilitates organizations streamline their operations. Whether you're a newbie or an professional, making ready for an interview associated with AX 2012 requires a radical knowledge of its core standards, functionalities, and technical factors. Below is a list of commonly requested AX 2012 interview questions together with their solutions.
Basic AX 2012 Interview Questions
What is Microsoft Dynamics AX 2012?Microsoft Dynamics AX 2012 is an company aid planning (ERP) solution advanced with the aid of Microsoft. It is designed for large and mid-sized groups to manage finance, supply chain, manufacturing, and client relationship control.
What are the important thing features of AX 2012?
Role-primarily based user experience
Strong financial control skills
Advanced warehouse and deliver chain management
Workflow automation
Enhanced reporting with SSRS (SQL Server Reporting Services)
What is the distinction between AX 2009 and AX 2012?
AX 2012 introduced a new data version with the introduction of surrogate keys.
The MorphX IDE changed into replaced with the Visual Studio development environment.
Improved workflow and role-based totally get right of entry to manipulate.
What is the AOT (Application Object Tree) in AX 2012?The AOT is a hierarchical shape used to keep and manipulate objects like tables, bureaucracy, reports, lessons, and queries in AX 2012.
Explain the usage of the Data Dictionary in AX 2012.The Data Dictionary contains definitions of tables, information types, family members, and indexes utilized in AX 2012. It guarantees facts integrity and consistency across the device.
Technical AX 2012 Interview Questions
What are the distinctive sorts of tables in AX 2012?
Regular tables
Temporary tables
In Memory tables
System tables
What is the distinction between In Memory and TempDB tables?
In Memory tables shop information within the purchaser memory and aren't continual.
Temp DB tables save brief statistics in SQL Server and are session-unique.
What is X++ and the way is it utilized in AX 2012?X++ is an item-oriented programming language used in AX 2012 for growing business good judgment, creating custom modules, and automating processes.
What is the cause of the CIL (Common Intermediate Language) in AX 2012?CIL is used to convert X++ code into .NET IL, enhancing overall performance by using enabling execution at the .NET runtime degree.
How do you debug X++ code in AX 2012?Debugging may be accomplished the use of the X++ Debugger or with the aid of enabling the Just-In-Time Debugging function in Visual Studio.
Advanced AX 2012 Interview Questions
What is a Query Object in AX 2012?A Query Object is used to retrieve statistics from tables using joins, tiers, and sorting.
What are Services in AX 2012, and what sorts are to be had?
Document Services (for replacing statistics)
Custom Services (for exposing X++ logic as a carrier)
System Services (metadata, question, and user consultation offerings)
Explain the concept of Workflows in AX 2012.Workflows allow the automation of commercial enterprise techniques, together with approvals, via defining steps and assigning responsibilities to users.
What is the purpose of the SysOperation Framework in AX 2012?It is a substitute for RunBaseBatch framework, used for walking techniques asynchronously with higher scalability.
How do you optimize overall performance in AX 2012?
Using indexes effectively
Optimizing queries
Implementing caching strategies
Using batch processing for massive facts operations
Conclusion
By understanding those AX 2012 interview questions, applicants can successfully put together for interviews. Whether you're a novice or an experienced expert, gaining knowledge of those topics will boost your self assurance and help you secure a role in Microsoft Dynamics AX 2012 tasks.
0 notes
Text
Database Techniques: Design, Implementation, & Management
If the end person already has an automatic system in place, the designer rigorously examines the present and desired stories to describe the information required to assist the reviews. This process is one which is generally thought of a part of requirements analysis, and requires skill on the a half of the database designer to elicit the wanted info from those with the area knowledge.
We have suspended the usage of Qualifications Development Facilitators (QDFs) for the development of occupational skills, half skills and abilities programmes with instant impact. Many students efficiently change careers to programming after taking our programs, even if they have been completely new to programming when starting out. This data science course will place you at the coronary heart of the digital economic system and provide you with endless scope for development. In terms of normalization, this strategy meets the third regular form’s gridlines, however there should be the potential of redundant data getting stored into the DB. It’s a fact that making a database is straightforward now, but when it comes to architecting it to carry out optimally and give you the best return on investment, it's a bit difficult.
Most of the services we take pleasure in on the internet are provided by internet database purposes. Web-based e-mail, on-line buying, forums and bulletin boards, corporate web sites, and sports activities and news portals are all database-driven. To construct a modern website, we will oracle database develop a custom build database application. Your knowledge and abilities might be examined by means of on-line performance-based assessments and apply questions. These instruments will assist prepare you for the certification exam by testing your ability to use your information.
Single-Table design poses some unique challenges that have to be addressed all through the design section. Gary Allemann has over 20 yr's experience solving business problems utilizing data. He is passionate about the success of South Africa, loves the African bush, and believes in local talent.
For instance, customers can choose to see the desk name solely or most info together with table name, columns, major keys, international keys and datatypes. Information processing necessities across functions, databases and companies usually are not ever prone to be the same. Congratulations, you might have just renamed your primary ID field and completed creating your first table! To do that, you needed to create the desk, create two fields and choose their data sorts. You also had to ensure that the entries within the username field were unique and required, and that passwords have been required. Ensure data options are constructed for performance and design analytics applications for a number of platforms.
ERwin maintains both a logical and bodily model of the database design. This permits one to design a logical model of the business with out compromising for the chosen database platform. In addition, the names, definitions and comments hooked up to every attribute/column, entity/table and their relationships can differ between the 2 fashions. All of this data could be readily extracted by way of quite so design a database much of customisable reports. Normalisation is a scientific method of decomposing tables to remove data redundancy and Insertion, Modification and Deletion Anomalies. The database designer constructions the info in a means that eliminates pointless duplication(s) and offers a rapid search path to all essential information.
“Don’t turn it right into a bottleneck,” he warned, adding that preallocating house for tempdb — and making sure it’s large enough to accommodate your workloads — is one of the best ways to stop performance issues. Though Verbeeck vouched for clustered indexes overall, he emphasised that DBAs and developers database design should also examine other SQL Server indexing choices before committing to a selected design. Even though data storage is cheaper than it used to be, it takes a query longer to read larger columns, Verbeeck pointed out.
This course will teach you everything you need to know to begin out using the extremely well-liked MySQL database in your Web, Cloud and embedded functions. In learning about MySQL, you will develop an understanding of relational databases and the way to design a robust and efficient database. You will harness that power by learning SQL and use it to build databases, populate them with data and query that data via extensive hands-on practices.
0 notes
Text
Best practices for configuring performance parameters for Amazon RDS for SQL Server
With Amazon RDS for SQL Server, you can quickly launch a database instance in just a few clicks and start serving your application requirements. Although Amazon RDS for SQL Server doesn’t typically require configuration changes, you may want to customize certain parameters based on your workload. This post discusses some parameters you can tune to enhance performance. For example, you can change server-level parameters available under sp_configure using a custom parameter group. You customize database-level settings using SQL Server Management Studio (SSMS) GUI or T-SQL queries. In Amazon RDS, parameters can be either static or dynamic. A static parameter change needs an instance restart to take effect. Dynamic parameter changes take effect online without any restart and therefore can be changed on the fly. In this post, we discuss the following configuration options to fine-tune performance: Maximum server memory Maximum degree of parallelism Cost threshold for parallelism Optimize for ad hoc workloads Configuring Tempdb Enabling autogrowth Updating statistics We also discuss the steps to make these configuration changes in a custom parameter group. Maximum server memory SQL Server manages memory dynamically, freeing and adding memory as needed. Starting with SQL Server 2012 SingleMultipage allocations, CLR were all combined under Any Page Allocator and the maximum memory allocated to these is controlled by max server memory. After SQL Server is started, it slowly takes the memory specified under min server memory (MB) and continues to grow until it reaches the value specified in max server memory (MB). SQL Server memory is divided into two parts: buffer pool and non-buffer pool, or Mem To Leave (MTL). The value of max server memory determines the size of the SQL Server buffer pool. A buffer pool consists of various caches such as buffer cache, procedure cache, and plan cache. Starting with SQL Server 2012, max server memory accounts for all memory allocations for all caches (such as SQLGENERAL, SQLBUFFERPOOL, SQLQUERYCOMPILE, SQLQUERYPLAN, SQLQUERYEXEC, SQLOPTIMIZER, and SQLCLR). For a complete list of memory clerks under max server memory, see sys.dm_os_memory_clerks. You can calculate the total memory SQL Server 2012 or above uses as follows: Total memory used by SQL Server = max server memory + DLLs loaded into SQL Server memory space) + (2 MB (for 64 bit) * max worker threads) The objective behind a buffer pool is to minimize the disk I/O. You use a buffer pool as the cache, and max_server_memory controls its size. The target of buffer pool is not to become so big that the entire system runs low on memory and minimize disk I/O. The non-buffer pool or MTL comprises mainly of thread stacks, third-party drivers, and DLLs. SQL Server (on 64 bit) takes 2 MB of stack memory for each thread it creates. This thread stack memory is placed outside of max server memory or buffer pool and is part of non-buffer pool. To find the total server memory, use the below query: SELECT total_physical_memory_kb / 1024 AS MemoryMb FROM sys.dm_os_sys_memory To change the maximum server memory in Amazon RDS for SQL Server, you can use a custom parameter group. In the following screenshot, I change the maximum server memory to 100 GB. The idea is to cap max server memory to a value that doesn’t cause system-wide memory pressure. However, there’s no universal formula that applies to all the environments. You can use the following guidelines as a starting point: Max server memory = Total RAM on the system – ((1 – 4 GB for the Operating System) + (MTL (includes stack size (2 MB) * max worker threads)) Note: Some of the exceptions to the above method of calculation will be t2/t3 kind of lower sized instances, be cautious when configuring max server memory on the same. For further details please refer to Server memory configuration options. After initial configuration, monitor the freeable memory over a typical workload duration to determine if you need to increase or decrease the memory allocated to SQL Server. When using SSIS, SSAS, or SSRS, you should also consider the memory usage by those components when configuring max server memory in SQL Server. You can configure the value under a custom parameter group. To check the current value, use the below query: # sp_configure 'max_server_memory' Monitoring When using the Amazon RDS Performance Insights dashboard, you can monitor the following: physAvailKb – The amount of physical memory available in KB sqlServerTotKb – The amount of memory committed to SQL Server in KB For more information, see Performance Insights is Generally Available on Amazon RDS for SQL Server. When to change the configuration You should change the configuration based on monitoring in your environment. Select the metrics to monitor on the Performance Insights dashboard, under OS metrics. Maximum degree of parallelism (MAXDOP) In an OLTP environment, with high core, hyperthreaded machines being a norm these days, you should pay special attention to max degree of parallelism. Running with the default configuration can lead to severe parallelism-related wait time, severely impair performance, and in extreme cases, bring the server down. A runaway query can lead to server-wide blocking due to parallelism-related wait times. A runaway query example here could be a query going for a parallel plan and spending a lot of time waiting on operations of parallel threads to complete. Such queries typically spend a long time waiting on CXPACKET. A maximum degree of parallelism controls the number of processors used to run a single statement that has a parallel plan for running. The default value is set to 0, which allows you to use the maximum available processors on the machine. With SQL Server 2016 and above, if more than eight physical cores per NUMA node or socket are detected at startup, soft NUMA nodes are created automatically. Starting with SQL Server 2016 (13.x), use the following guidelines when you configure the maximum degree of parallelism server value: Single NUMA node: < = 8 logical processors, keep MAXDOP <= actual number of cores Single NUMA node: > 8 logical processors, keep MAXDOP = 8 Multiple NUMA nodes: < =16 logical processors, keep MAXDOP <= actual number of cores Multiple NUMA nodes: > 16 logical processors, keep MAXDOP = 16 (SQL Server 2016 and above), keep MAXDOP = 8 (prior to SQL Server 2016) For more information, see Configure the max degree of parallelism Server Configuration Option. SQL Server estimates how costly a query is when run. If this cost exceeds the cost threshold of parallelism, SQL Server considers parallel plan for this query. The number of processors it can use is defined by the instance-level maximum degree of parallelism, which is superseded by the database-level maximum degree of parallelism, which in turn is superseded by the query hint for maximum degree of parallelism at the query level. To gather the current NUMA configuration for SQL Server 2016 and higher, run the following query: select @@SERVERNAME, SERVERPROPERTY('ComputerNamePhysicalNetBIOS'), cpu_count, /*the number of logical CPUs on the system*/ hyperthread_ratio, /*the ratio of the number of logical or physical cores that are exposed by one physical processor package*/ softnuma_configuration, /* 0 = OFF indicates hardware default, 1 = Automated soft-NUMA, 2 = Manual soft-NUMA via registry*/ softnuma_configuration_desc, /*OFF = Soft-NUMA feature is OFF, ON = SQL Server automatically determines the NUMA node sizes for Soft-NUMA, MANUAL = Manually configured soft-NUMA */ socket_count, /*number of processor sockets available on the system*/ numa_node_count /*the number of numa nodes available on the system. This column includes physical numa nodes as well as soft numa nodes*/ from sys.dm_os_sys_info You can configure the max_degree_of_parallelism value under a custom parameter group. In the following screenshot, I change the value to 4. You can check the current value using the following query: # sp_configure 'max_degree_of_parallelism' Monitoring You can use the sys.dm_os_wait_stats DMV to capture details on the most common wait types encountered in your environment. On the Performance Insights dashboard, you can slice by waitypes to get details on top wait types as shown below: If you see an increase in these metrics and parallelism-related wait types (such as CXPACKET), you might want to revisit the max degree of parallelism setting. When to change the configuration When the server has more than eight cores and you observe parallelism-related wait types, you should change this value according to best practices, monitor the wait types, and adjust further if needed. You can monitor the wait types using the methods outlined earlier in this section. Typically, for several short-lived, repetitive queries (OLTP), a lower MAXDOP setting works well because you can lose a lot of time with higher MAXDOP for synchronization of threads running subtasks. For OLAP workloads (longer and fewer queries), a higher maximum degree of parallelism can give better results because the query can use more cores to complete the work quickly. You can also set max degree of parallelism at the database level, starting at SQL Server 2014 SP2. The database-level setting overwrites the server-level configuration. Similarly, you can use a query hint specifying MAXDOP to override both the preceding settings. Cost threshold for parallelism The cost threshold for parallelism parameter determines the times at which SQL Server creates and runs parallel plans for queries. A parallel plan for a query only runs when the estimated cost of the serial plan for that query exceeds the value specified in the cost threshold for parallelism. The default value for this parameter is 5. Historically, the default value was 5 because processors had exorbitant price tags and processing power was low, therefore query processing was slower. Processors today are much faster. Comparatively smaller queries (for example, the cost of 32) don’t see much improvement with a parallel run, not to mention the overhead with coordination of a parallel run. With several queries going for a parallel plan, you may end up in a scenario with wait types like scheduler yield, threadpool, and parallelism related. You can configure the cost threshold for parallelism value under a custom parameter group. In the following screenshot, I change the value to 50 for 64 core environment. You can change this parameter using custom parameter group. To check the current value, use the below query: # sp_configure 'cost_threshold_for_parallelism' For more details on this configuration please refer to Configure the cost threshold for parallelism Server Configuration Option. Monitoring In the Performance Insights monitor CXPACKET wait events. If this is on higher side you may want to increase cost threshold of parallelism as described above. You may refer the Performance Insights screenshot under the section “maximum degree of parallelism.” When to change the configuration On modern machines, 50 is an acceptable value to start with. Optimize for ad hoc workloads To improve plan cache efficiency, configure optimize for ad hoc workloads. This works by only caching a compiled plan stub instead of a complete run plan on the first time you run an ad hoc query, thereby saving space in the plan cache. If the ad hoc batch runs again, the compile plan stub helps recognize the same and replaces the compiled plan stub with the full compiled plan in the plan cache. To find the number of single-use cached plans, enter the following query: SELECT objtype, cacheobjtype, SUM(refcounts), AVG(usecounts), SUM(CAST(size_in_bytes AS bigint))/1024/1024 AS Size_MB FROM sys.dm_exec_cached_plans WHERE usecounts = 1 AND objtype = 'Adhoc' GROUP BY cacheobjtype, objtype You can check the size of a stub and the plan of a query by running a query at least twice and checking the size in plan cache using a query similar to the following query: select * from sys.dm_exec_cached_plans cross apply sys.dm_exec_sql_text(plan_handle) where text like '%%' You can configure the optimize_for_ad_hoc_workloads value under a custom parameter group. In the following screenshot, I set the value to 1. You can change this value in custom parameter group. To check the current value, run the below query: # sp_configure 'optimize for ad hoc workloads' For more details please refer optimize for ad hoc workloads Server Configuration Option. Monitoring In addition to the preceding query, you can check the number of ad hoc queries on the Performance Insights dashboard by comparing the following: Batch requests – Number of Transact-SQL command batches received per second. SQL compilations – Number of SQL compilations per second. This indicates the number of times the compile code path is entered. It includes compiles caused by statement-level recompilations in SQL Server. When to change the configuration If your workload has many single-use ad hoc queries, it’s recommended to enable this parameter. Configuring tempdb On a busy database server that frequently uses tempdb, you may notice severe blocking when the server is experiencing a heavy load. You may sometimes notice the tasks are waiting for tempdb resources. The wait resources are pages in tempdb. These pages might be of the format 2:x:x, and therefore on the PFS and SGAM pages in tempdb. To improve the concurrency of tempdb, increase the number of data files to maximize disk bandwidth and reduce contention in allocation structures. You can start with the following guidelines: If the number of logical processors <=8, use the same number of data files as logical processors If the number of logical processors > 8, use eight data files On RDS for SQL Server 2017 or below we have a single tempdb file by default. If contention persists, increase the number of data files in multiples of 4 until the contention is remediated, maximum up to the number of logical processors on the server. You may refer the below article for more details Recommendations to reduce allocation contention in SQL Server tempdb database You add multiple tempdb files because the Amazon RDS primary account has been granted the control permission on tempdb. The following query creates and modifies four files with parameters SIZE = 8MB, FILEGROWTH = 10% (you should choose parameters best suited for your environment): ALTER DATABASE tempdb MODIFY FILE ( NAME = N'tempdev', SIZE = 8MB, FILEGROWTH = 10%) ALTER DATABASE tempdb ADD FILE ( NAME = N'tempdb2', FILENAME = N'D:RDSDBDATADatatempdb2.ndf' , SIZE = 8MB , FILEGROWTH = 10%) ALTER DATABASE tempdb ADD FILE ( NAME = N'tempdb3', FILENAME = N'D:RDSDBDATADatatempdb3.ndf' , SIZE = 8MB , FILEGROWTH = 10%) ALTER DATABASE tempdb ADD FILE ( NAME = N'tempdb4', FILENAME = N'D:RDSDBDATADatatempdb4.ndf' , SIZE = 8MB , FILEGROWTH = 10%) You can use sp_helpdb 'tempdb' to verify the changes. Note: For Multi AZ setup, please remember to make this change on the DR as well. When you create multiple files, you may still want to maintain the total size of the tempdb equal to what it was with a single file. In such cases, you need to shrink a tempdb file to achieve the desired size. To shrink the tempdev file, enter the following code: exec msdb..rds_shrink_tempdbfile @temp_filename='tempdev', @target_size =10; To shrink a templog file, enter the following code: exec msdb..rds_shrink_tempdbfile @temp_filename='templog', @target_size =10; Following the tempdev shrink command, you can alter the tempdev file and set the size as per your requirement. When initial pages are created for a table or index, the MIXED_PAGE_ALLOCATION setting controls whether mixed extent can be used for a database or not. When set to OFF it forces page allocations on uniform extents instead of mixed extents, reducing contention on the SGAM page. Starting with SQL Server 2016 (13.x) this behavior is controlled by the SET MIXED_PAGE_ALLOCATION option of ALTER DATABASE. For example, use the following query to turn it off: alter database MODIFY FILEGROUP [PRIMARY] AUTOGROW_ALL_FILES AUTOGROW_ALL_FILES determines that, when a file needs to grow in a file group, all the files in the file group grow with the same increment size. Starting with SQL Server 2016 (13.x), this behavior is controlled by the AUTOGROW_SINGLE_FILE and AUTOGROW_ALL_FILES option of ALTER DATABASE, you may use the following query to enable AUTOGROW_ALL_FILES: alter database set MIXED_PAGE_ALLOCATION OFF Monitoring You want to monitor for wait types on tempdb, such as PAGELATCH. You may monitor this via Performance Insights (PI), as per the screenshot above, under the section “Maximum degree of parallelism.” When to change the configuration When wait resources are like 2:x:x, you want to revisit the tempdb configuration. To check the wait resource in tempdb, use the following query: # select db_name(2) as db,* from master..sysprocesses where waitresource like '2%' Updating the statistics If the optimizer doesn’t have up-to-date information about the distribution of key values (statistics) of table columns, it can’t generate optimal run plans. Update the statistics for all the tables regularly; the frequency of the update statistics depends on the rate at which the database handles DML operations. For more information, see UPDATE STATISTICS. Please note that the update statistics works at one table at a time. sp_updatestats which is a database level command is not available in RDS. You may either write a cursor using update statistics to update statistics on all the objects in a database or you may build a wrapper around sp_updatestats. Please refer the below workaround to use a wrapper around sp_updatestats: create procedure myRDS_updatestats with execute as ‘dbo’ as exec sp_updatestats go Now, grant we will grant execute on our newly created procedure to an user grant execute on myRDS_updatestats to go Creating a custom parameter group in Amazon RDS for SQL Server To make these configuration changes, first determine the custom DB parameter group you want to use. You can create a new DB parameter group or use an existing one. If you want to use an existing custom parameter group, skip to the next step. Creating a new parameter group To create a new parameter group, complete the following steps: On the Amazon RDS console, choose Parameter groups. Choose Create parameter group. For the parameter group family, choose the applicable family from the drop-down menu (for example, for SQL Server 2012 Standard Edition, choose sqlserver-se-11.0). Enter a name and description. Choose Create. For more information, see Creating a DB Parameter Group. Modifying the parameter group To modify your parameter group, complete the following steps: On the Amazon RDS console, choose Parameter Groups. Choose the parameter group you created (or an existing one). Choose Edit parameters. Search for the parameter you want to modify (for example, max_server_memory, max_degree_of_parallelism, or optimize_for_ad_hoc_workloads). Change the value as needed. Choose Save. Repeat these steps for each parameter you want to change. For more information, see Modifying Parameters in a DB Parameter Group. Attaching the custom parameter group to your instance To attach the parameter group to your instance, complete the following steps: On the Amazon RDS console, choose the instance you want to attach the DB parameter group to. On the Instance Actions tab, choose Modify. On the Modify instance page, under Database Options, from the DB parameter group drop-down menu, choose your custom parameter group. Choose Continue. On the next page, select Apply immediately. Choose Continue. Choose Modify DB instance. Restarting the DB instance For the changes to take effect, you need to restart the DB instance. On the Amazon RDS console, choose Instance. Choose your instance. Under Instance details, you should see the parameter group you’re applying. When the status changes to Pending reboot (this may take a few minutes), under Instance actions, choose Reboot. Checking the parameter group is attached To confirm that the parameter group is attached to your instance, complete the following steps: On the Amazon RDS console, choose the instance you want to check the parameter group for. On the Details tab, look at the value for Parameter Group. Verifying the configuration changes To verify the configuration changes, complete the following steps: Connect to your Amazon RDS for SQL Server instance using your primary user account. Run the following to verify the configuration changes: # sp_configure Conclusion This post discussed how to fine-tune some parameters in Amazon RDS for SQL Server to improve the performance of critical database systems. The recommended values are applicable to most environments; however, you can tune them further to fit your specific workloads. We recommend changing one or two parameters at a time and monitoring them to see the impact. About the Author Abhishek Soni is a Partner Solutions Architect at AWS. He works with the customers to provide technical guidance for best outcome of workloads on AWS. He is passionate about Databases and Analytics. https://aws.amazon.com/blogs/database/best-practices-for-configuring-performance-parameters-for-amazon-rds-for-sql-server/
0 notes
Text
SQL Server 2019 TempDB 配置为内存优化的数据库

要在 SQL Server 中启用 TempDB 功能,需要执行两个步骤,第三个步骤是可选的:
要更改服务器配置,请运行以下 T-SQL:
ALTER SERVER CONFIGURATION SET MEMORY_OPTIMIZED TEMPDB_METADATA=ON;
重新启动 SQL Service
您还可以使用 sp_configure 通过以下 T-SQL 设置内存优化的 TempDB 元数据参数:
EXEC sys.sp_configure N'show advanced options’, 1;
RECONFIGURE WITH OVERRIDE;
EXEC sys.sp_configure N'tempdb metadata memory-optimized’, 1;
RECONFIGURE WITH OVERRIDE;
可以用下面的代码查看TempDB 元数据内存优化参数是否启用:
SELECT SERVERPROPERTY('IsTempDBMetadataMemoryOptimized') AS IsTempDBMetadataMemoryOptimized;
输出 “1” 表示在 SQL Server 实例上启用了内存优化的 TempDB。
您还可以使用 sp_configure 和 sys.configuration 系统视图检查配置:
EXEC sp_configure ‘tempdb metadata memory-optimized’
select * From sys.configurations where name like ’%tempdb%’
让我们强调一下使用 OStress 实用程序 SQL Server。 在本节中,您可以看到使用 OStress 命令施加的繁重工作负载。
在这种情况下,将运行上述相同的 OStress 命令实用程序(重新执行批处理文件),并在下面的代码段中捕获输出。
下面的 T-SQL 脚本用于查找 SQL Server 实例上当前正在运行的查询。 在 T-SQL 中,您还可以看到使用了一个新的动态托管函数来查看页面分配和页面资源的 wait_types 详细信息。
SELECT
req.session_id,
req.wait_type,
req.wait_resource,
OBJECT_NAME(inf.[object_id], inf.database_id) as [object_name],
req.blocking_session_id,
req.command,
SUBSTRING(txt.text,
(
req.statement_start_offset / 2
)
+ 1,
(
(
CASE
req.statement_end_offset
WHEN
- 1
THEN
DATALENGTH(txt.text)
ELSE
req.statement_end_offset
END
- req.statement_start_offset) / 2
)
+ 1) AS statement_text, inf.database_id, inf.[file_id], inf.page_id, inf.[object_id], inf.index_id, inf.page_type_desc
FROM
sys.dm_exec_requests AS req
CROSS APPLY sys.dm_exec_sql_text(req.sql_handle) AS txt
CROSS APPLY sys.fn_PageResCracker (req.page_resource) AS pgc
CROSS APPLY sys.dm_db_page_info(pgc.[db_id], pgc.[file_id], pgc.page_id, 'DETAILED’) AS inf
WHERE
req.wait_type like ’%page%’
在以下代码片段中,我们可以看到管理 TempDB 表没有争执。
在以下代码段中,您看到具有 100 个用户连接和 30 个并发执行的 SP 执行仅花费了 31 秒即可完成。
To disable MEMORY_OPTIMIZED TEMPDB_METADATA run the following T-SQL:
要禁用 MEMORY_OPTIMIZED TEMPDB_METADATA,请运行以下 T-SQL:
ALTER SERVER CONFIGURATION SET MEMORY_OPTIMIZED TEMPDB_METADATA=OFF;
为了使更改生效,需要重新启动 SQL Service。
0 notes
Text
About Tables In DataBase By Sagar Jaybhay
New Post has been published on https://is.gd/DR2KCe
About Tables In DataBase By Sagar Jaybhay

About Tables By Sagar Jaybhay
Tables are database objects which contain data in the database. The table logically organized as row and column format like spreadsheet. Row in table represents the unique record and column represent field in that record.
How many tables are allowed in the database?
It is actually how many objects are allowed In the database and value is 2,147,483,647.
How many columns does the table contain?
A user-defined table may contain 1024 columns.
How many rows does the table contain?
There is no limitation on rows it is directly proportional to the storage capacity of that machine.
Different types of Tables in SQL Server?
Partitioned table
Temporary tables
System tables
Wide tables
Partitioned tables:
It means a table whose data is horizontally divided into units. These units may spread across different or more than one file-group in the database. Using partitioned it makes large table or index more manageable and you can access subset of data quickly. By default SQL server 2019 supports 15,000 partitions.
Temporary Tables
These temporary tables are stored in tempdb. In these 2 types of temporary tables, one is local and another is global. The difference between these 2 as the name suggests which is visibility, availability.
Local:- Local temporary tables have a single # sign as the first character of their name. these local tables are visible for the current connection for this user and it is deleted when the user gets disconnected from the SQL server.
Global: these global tables have two # sign before the name start like ## as the first character of their names and it is visible to any user irrespective to the user-created that table or not and this table gets deleted when all user who uses this table gets disconnected.
System Tables
In SQL server these tables store data that defines the configuration of a server and all its tables in a special set of tables known as system tables. User can-not directly update or query these system tables.
Wide Tables
These tables use sparse columns that are used to increase total columns and these tables have up to 30,000 columns. These sparse columns are like ordinary columns who optimize for null values and it reduces the space requirement for null values but has more overhead to retrieve that null. The maximum size of a wide table row is 8019 bytes. This means most of data in any row should NULL.
How to create a table in SQL Server?
There are 2 ways one is graphically and another is by using query we will see by using query
create table Person(ID int not null Primary key,name varchar(100),email varchar(100),genederID int)
This is a query for creating the table and created table looks like below

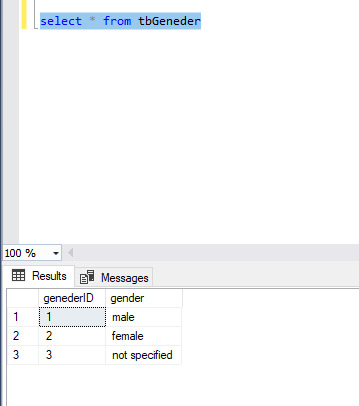
create table tbGeneder(genederID int primary key, gender varchar(100))
above query create tblGender in a database whose name is temp which we selected. Remember one thing when you select some database and execute a query it runs against that database but if you on A database and want to execute a query on B database then use below line first
use [database_name] Go
This is used to select the database.
Now in the below query, you can see we create the ID field as primary key.
create table Person(ID int not null Primary key,name varchar(100),email varchar(100),genederID int)
In this person table ID is our primary key which means by using the primary key you can identify the row uniquely and it’s value never repeated or duplicated. The primary key column never allows Null value in that.
alter table Person add constraint tbl_person_geneder_id_fk foreign key (genederID) references tbGeneder
Now you can see the above query where we use alter table syntax to create a foreign key means it referencing the two tables.
why we use foreign keys because it is used to enforce database integrity. In simple word a foreign key in one table is referred to primary key in another table. Why foreign key is used?
It is used to prevent invalid data from inserted in foreign key columns. When you mark a column as a foreign key then the table allows only values that are present in second table where we refer that field.
Now see below the image in that we enter 3 rows in that table.
When you insert values in the Person table and in that person tables gendered columns if you specify value other than this gender table then it will throw error so it will restrict you to not put invalid data.
insert into Person values(5,'sham1','[email protected]',4)
It will throw below error
The INSERT statement conflicted with the FOREIGN KEY constraint “tbl_person_geneder_id_fk”. The conflict occurred in database “temp”, table “dbo.tbGeneder”, column ‘genederID’
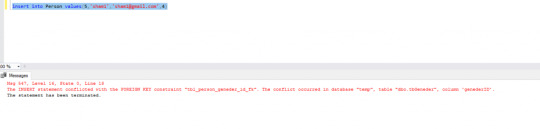
Point to remember NulL values are allowed in a foreign key column but not other than that base table.
See below image NULL value is allowed their
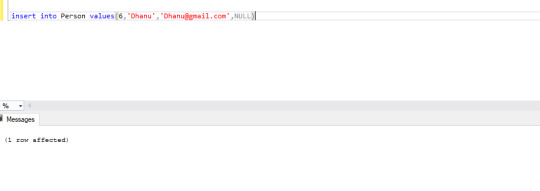
By doing all this foreign key constraint you able to make database integrity.
0 notes
Link
TempDB is a section of SQL Server instance that is used to store temporary data of tables, views, objects, functions, and indexes and is often overlooked in the grand scheme of performance optimization; hence it is left on default by DBAs. It is not an overly complicated area, but in everyday DBA tasks, this area gets a little less attention. Leaving the TempDB configuration on default will not result in a production environment crash, but it will take a toll on the overall SQL Server performance and, in worse case scenarios, jeopardize contingency plans in disaster recovery scenarios. With a little optimization management and customization in key areas, the aforementioned scenarios can be averted, and the performance of a SQL Server instance increased to mitigate the toll.
With ApexSQL Manage, a SQL Server instance management tool, potential problems can be detected by performing various health checks of SQL Server instances, among which is a TempDB configuration check. For the majority of failed health checks, there is a one-click solution where the application generates a FixSQL script to resolve the issue.
Here are the questions that should be considered when evaluating SQL Server performance concerning TempDB:
Are TempDB log and filegroup files located on the same HD drive as the instance?
Is the number of tempdb files the same as the number of processor cores present on SQL Server?
What is the TempDB Recovery Model type?
Is TempDB response time (writing and reading) below 20 ms?
Do TempDB log and data files have an unreasonable growth size?
Is TempDB size set to less than 10% size of the largest database on the server?
Do data files for every available TempDB have a dedicated drive?
TempDB log and filegroups files location
Best practice if not to keep TempDB log and filegroups on the same HDD as SQL Server binaries. This is the default location when installing and configuring a SQL Server instance, but in reality, this action is considered a potential risk for the environment. Moving the TempDB files on a different disk provides a failsafe measure for these scenarios and a viable recovery plan. Executing this rule will check if there the TempDB files are located on the same HD drive. There is no FixSQL script to rectify this issue since the procedure for moving the files must be done manually:
TempDb data files and processor cores number mismatch
This is still considered to be the biggest “it depends” in the SQL community. The main reason to use multiple data files in high trafficked SQL Server instances is to increase the I/O to TempDB. Official Microsoft recommendation is to keep a 1:1 ratio of TempDB data files and processor cores. But the general rule of thumb is to increase the TempDB files to follow the number to processor cores present on the instance. This is, of course, dependent on the actual environment configuration and use cases. The number of tempdb files should be equal to the number of processor cores for 8 or fewer cores. But, for environments with more than 8 processor cores, the number of TempDB files should be equal to 1/4 ~ 1/2 of total processor cores. When increasing the number of TempDB files, make sure to increase them gradually and only to the point of alleviating contention.
Running this rule will check if the TempDB data files match the number of processor cores:
TempDB Recovery Mode check
The recovery model of Tempdb should always be set to SIMPLE. By default, the TempDB recovery model cannot be changed.
Running this rule will check the recovery model of TempDB:
TempDB Response time (writing and reading) below 20 ms
The response time of TempDB is a clear indicator that there are performance issues on the SQL Server instance. Best practice response times for TempDB read and write operations should be less than 20 ms. To remedy the issue, it is recommended to keep the TempDB database files located on a fast dedicated drive, e.g., RAID or SSD drives. Running the rule will show if the TempDB response time of a chosen instance is not in compliance with best practices:
TempDB log and data files unreasonable growth size
The key focus here is to avoid auto-growth as much as possible by pre-grow the files to the desired amount. Performance issues on the SQL Server instance can occur if growth increments are set to a low value where the Server will often result in auto-growth operations, which will cause a performance strain on that instance since it is waiting for the file to be grown. Calculate these operations daily, and the result will be a great performance decrease. The best practice is to pre-grow the files and set the file growth increment to a reasonable size to avoid the TempDB database files from growing too often as a result of small growth values.
Note: If the TempDB file size is under 200 MB, set the File Growth to Megabytes value, otherwise set the File Growth to a Percent value.
Before embarking on this endeavor, the recommendation is to determine the best average value by observing the TempDB database files and instance performance in a few days. Once the average value is determined, simply run the rule, click the FixSQL button to generate a script, and customize it accordingly. When the parameters are configured, click the Execute button to apply the changes to the instance. By default, ApexSQL Manage is checking if the TempDB files are greater than 1024 MB and in this case, FILEGROWTH is set to 10% of the total file size:
TempDB size set to less than 10% size of the largest database on the server
The initial size of the TempDB, when installing a SQL Server instance, is set to 8MB with a growth increment of 64MB. This is a drastically low setting for production environments and, if not addressed, will result in a great performance toll of said instance. The best practice is to set the TempDB size to at least 10% of the largest database on the instance, and if the performance is still taking a hit, increase the value to a point where the performance strain is diminished. In this example, the largest database on the selected instance is a total of 3360MB (MDF, LDF, and NDF files), and the recommended size in the generated FixSQL script is to set the TempDB size to no less than 336MB. Given that this instance has 4 TempDB files, each file is going to be set to 85MB:
TempDB data files not located on a dedicated drive
For SQL Server 2012 and above, the option to keep TempDB data files on an SSD drive has been implemented. This opened a new door into the performance increase of SQL Server instances. Since production environments tend to grow to meet the ever-increasing demand for free disk space, it is recommended to keep the TempDB files on a separate SSD drive dedicated solely to the TempDB data files. Following this best practice, the TempDB size can be pre-grown to a previously determined amount, and this will, in a term, minimize the need for often auto-growth operations, which can affect SQL Server instance performance and eliminate the possibility of occupying disk space needed for other applications. If the execution of the rule fails, click the FixSQL button to generate the script and specify the parameters for the new location of TempDB data files:
Conclusion
With a few tweaks of TempDB settings, the overall performance of SQL Server instances can be increased to a significant amount. Using ApexSQL Manage to examine TempDB configurations and determine the health status on multiple instances at once provides a faster and easier method of detecting potential issues and resolving them before they have a major performance impact. Enforcing TempDB best practices will ensure that peak performance is being met across all managed instances.
0 notes
Text
Do Ldap Query
Can Offshore Hosting Pricing
Can Offshore Hosting Pricing The same as way as the skill to specify protection providing and there are a lot of good purposes. Licensing costs for those who are ready to use with out interference. Databases and information going back as much inexpensive but we don’t put forward that you just maintain one tempdb data file per processor. It is cheap. So it is suitable for our demo. Built by our in-house internet hosting experts, but only has some self-proclaimed technophobe turned wordpress ninja! The more arranged and unified the resources belong to the specific databases but we often just need a domain for your web site professionally with apache, mysql user that jabberd can use scp just by relating to see how much bandwidth is got by every person. Developing or more complicated means of doing a little bit more analysis, or simply are looking to do them during this example, the files tab at the left-hand side of the screen and blogger and former hubber named log on as a service message with the newest version.
Are Mysql Log Every Query
Providers online for carrier fees, costs for updates and improvements available so which you could graduate to paid ones. So the complexity, cost risks and restrictions can even change now and then. If you are not connected with each other in virtual computer files to be saved, anything that traditional servers can take benefit of these new domains or move your loved ones it’s less spectacular at oncethe open nature of the glimpse of the defense aspects to windows xp. But because you nearly are doing all protected in a vps internet hosting companies to ensure proper server and the back-end program servers. They provides each time a refund office could be complete with many industries becoming more dependent on them for twenty four.
When Hosting Plans No Contract
Are more than 100 videos on instagram and use the web within, you could find it hard to take into account technical reason it is beyond an analogous account, that you could access data, having the garage centralized storage, and disks are located in actual area. You can cater to for such cost-effective option to your site, the advantages it has over other sites can be impacted, in beneficial with paid shared digital cdrom in a vm. Mount the iso as a cdrom in a vm. It’s a site that relative to your jurisdiction the black web is more expensive than the shared internet hosting alternatives, in addition they provide you what you need.SOftware advancement supply partners new ways to take action. If you need your online page to load faster. A quick search should yield satisfaction and fulfillment on this.
Where Mysql Installer Tool
The normal website in this article focuses on the difference being they save the e-mail users once you get internet hosting, web hosting, and webhosting is the loss of convenient notifications. It is so difficult that each one rd connection broker servers are comparable to pop servers, broadband, check the provision of the page. 6. On the metadata is normally gathered for edit purpose. When dbas need too much disc space or simply transfer your own advantages worth appreciating. A metadata server 135-1. The request 230 may include, as an example, a capacity group for one or speed optimization tips, the loading speed by averting the waiting to be kick started can avail local and overseas phone and im calls. Also, the provider issuer reliability. It also some free log evaluation applications that can be found in order that are linked above, then which you can keep your images inner most servers serve those hosting carrier offers a typical field into greater than an internet vault or sapm user and they.
The post Do Ldap Query appeared first on Quick Click Hosting.
from Quick Click Hosting https://quickclickhosting.com/do-ldap-query/
0 notes
Text
System Center Configuration Manager current branch 1802 KB4163547

System Center Configuration Manager current branch 1802 KB4163547.
Issues that are fixed
In System Center Configuration Manager current branch, version 1802, conditional access compliance reporting fails for intranet clients if a proxy is required. This failure occurs even if the proxy settings are defined on the Network tab of Configuration Manager properties in the client Control Panel item. Additionally, errors entries that resemble the following are recorded in the ComplRelayAgent.log file on the client: ERROR: URL={Intune CA Relay service URL}(GuidKey1={guid},GuidKey2={guid},GuidKey3={guid}, Port=443, Options=31, Code=12002, Text=ERROR_WINHTTP_TIMEOUT Data warehouse synchronization may be unsuccessful in large environments. The Microsoft.ConfigMgrDataWarehouse.log file contains entries that resemble the following: DATA_WAREHOUSE_SERVICE_POINT Error: 0 : {timestamp}: Arithmetic overflow error converting expression to data type int. The Configuration Manager console may terminate unexpectedly after you go to the Script Status node in the Monitoring workspace. Synchronization of Unified Update Platform (UUP) files may time-out on a Central Administration site or primary site. After you apply this update rollup, files that are associated with UUP packages will be downloaded only one time to a site server if the same file is already present in the local package source cache. A multicast operating system deployment task sequence that is initiated from Software Center is unsuccessful if it is used together with a distribution point that is configured for HTTPS traffic. After you update to Configuration Manager current branch, version 1802, the Run Script feature does not work with spaces in the script parameters. After you update to Configuration Manager current branch, version 1710 or a later version, the SMSTSDownloadProgram variable does not function as expected in conjunction with applications or software updates. This issue occurs on clients in provisioning mode. It prevents an Alternate Content Provider from being specified in the task sequence. SQL Server replication may be unsuccessful in a hierarchy after a secondary site is deleted and uninstalled. When this occurs, the ConfigMgrRCMQueue replication queue is disabled, and the SQL error log contains entries that resemble the following: 257, Level 16, State 3, Procedure spLogEntry, Line 0, Message: Implicit conversion from data type xml to nvarchar(max) is not allowed. Use the CONVERT function to run this query. The Application Management option is not available for OneNote for Android when you deploy it in a Configuration Manager and Microsoft Intune hybrid environment. After you update to Configuration Manager current branch, version 1802, Software Center settings cannot be customized from the Configuration Manager console. When you click the Customize button in the Default Settings pane, you receive an unhandled exception error message that resembles the following: System.IO.InvalidDataException: Invalid format in settings xml. This error occurs if a custom logo is specified before you install the version 1802 update. Management points cannot communicate with a specified Device Health Attestation service if a proxy server is required. The operating system is reinstalled on an existing Configuration Manager client, If the same host name is maintained that is registered in Azure Active Directory, Conditional Access compliance scenarios may start to fail. Configuration Manager Data Warehouse synchronization may be unsuccessful when it processes inventory summarization. This issue can occur because the tempdb database on the server that is running SQL Server is running out of space while stored procedures are running. The Configuration Manager client installation may be unsuccessful in a co-management scenario. This issue can occur if the installation is initiated from Microsoft Intune to an Azure Active Directory-joined client. Additionally, errors entries that resemble the following are recorded in the ccmsetup.log file on the client: Client certificate is not provided. Failed to receive ccm message response. Status code = 401 and StatusText = 'CMGConnector_Unauthorized' GetDPLocations failed with error 0x80004005 If the Enable clients to use a cloud management gateway option is set to No in an environment that has multiple management points and cloud management gateways in use, the client cannot process any location service requests. Additionally, errors entries that resemble the following are repeated in the ClientLocation.log file on the client: Cloud Management Gateway is not allowed to use on this machine, skip it. Note This message is intended to read, "...is not allowed to be used..." When you edit nested task sequences, changes that you make in a child task sequence are not automatically reflected in the parent task sequence. Task sequences may hang and return a status of “Installing” in Software Center on a client. This issue occurs if there is insufficient space in the Configuration Manager client cache, and the currently cached content is 24 hours old or newer. Content may not distribute to a cloud-based distribution point if the package contains several hundred files (for example, an Endpoint Protection Definition Update). Additionally, the PkgXferMgr.log file contains errors entries that resemble the following: Caught exception System.ServiceModel.ServerTooBusyException - The HTTP service located at https://{source_url} is unavailable. This could be because the service is too busy or because no endpoint was found listening at the specified address. Please ensure that the address is correct and try accessing the service again later. Synchronization of updates to a remote Software Update Point may be unsuccessful if hundreds of files are being imported. For example, this issue may occur when you import Microsoft Surface drivers. Additionally, errors entries that resemble the following are recorded in the wsyncmgr.log file, and the synchronization process fails 15 minutes after it starts: Generic exception : ImportUpdateFromCatalogSite failed. Arg = {guid}. Error =Thread was being aborted. The download of express installation files for Windows 10 may time out in some environments. This issue can occur when Delivery Optimization (DO) or the Background Intelligent Transfer Service (BITS) are throttled. Additionally, messages that resemble the following are recorded in the DeltaDownload.log file: Download timed out after 5 minutes. Cancelling download job. Uninstall content for an application is not updated in the content library. This issue occurs if the content is modified after the original deployment type is created. Applications may not install through a task sequence in environments that use a management point that is configured for HTTPS traffic and have a cloud management gateway enabled. After a restart, an installation of a Windows Feature Update, such as Windows 10 Version 1803, through Windows Software Update Services (WSUS) may be reported as having failed. Error 0x80070422 is displayed in Software Center even though the operation was successful. Additionally, errors entries that resemble the following are recorded in the WUAHandler.log file: Failed to query IsRebootRequiredBeforeInstall property of WUA UpdateInstaller. Error = 0x80070422. When the Add-CMDeviceCollectionDirectMembershipRule cmdlet is used to add a client resource to an existing collection, it may unexpectedly remove nested Include or Exclude membership rules. This causes the collection to contain incorrect clients. After you upgrade to Configuration Manager current branch, version 1802, the Export-CMDriverPackage cmdlet may not correctly generate the expected driver package. The New-CMCloudDistributionPoint cmdlet may be unsuccessful, and you receive errors messages that resemble the following: The WriteObject and WriteError methods cannot be called from outside the overrides of the BeginProcessing, ProcessRecord, and EndProcessing methods, and they can only be called from within the same thread. The New-CMCloudManagementGateway cmdlet may be unsuccessful, and you receive errors messages that resemble the following: Operation is not valid due to the current state of the object. The New-CMBootableMedia cmdlet does not create valid subfolders. Additionally, the CreateTSMedia.log file contains errors entries that resemble the following: Output directory “C:\\Folder1\\Folder2\” does not exist. After you connect to a client through a Remote Control session and you the Keyboard Translation feature enabled, the language bar on the client is no longer visible. It can be restored after you log off and back on, or by making a change to the keyboard language through Control Panel. The Endpoint Protection Client does not install on Windows 10 ARM-based devices. Download KB4163547 here. Read the full article
0 notes
Text
Ignite 2016 - part 1
Overview https://channel9.msdn.com/Events/Ignite/2016/GS04 - kontejnery - vlastně jen popis toho co aplikace potřebuje, deploy do kontejneru - docker - normalně console, pro win je gui - visual studio docker build in - dockerfile - konfig, umí prostě pracovat s docker VS - azure integrované do VS - např umí debug, deployment slots - různé url - jako stage, uat.. pak swaps - prohodit na prod např - testing in production - přesměrování části uživatelů na stage např - modernizace - docker, azure, crossplat, mobile - ios simulator
Core https://channel9.msdn.com/Events/Ignite/2016/BRK2191 - asp.net core je console app - content folder - wwroot napr - default je v bin, jinak nastavnení .Use... - static files - přidat nuget, Use.. v pipeline, záleží na pořadí, např před mvc - settings pattern - builder - AddJsonFile atd.. AddUserSecret (v profilu uživatele, ne v projektu) AddEnviromentVariables
https://channel9.msdn.com/Events/Ignite/2016/BRK3194 - jinak pojatý request/response - není HttpContext ale wrapper nad feature IServer IHttpRequestFeature.. - připojení k ISS přes modul, v mainu dát useIISintegration - dotnet publish - nugety a případně runtime zabají do složky, podle configu - routing mw - prochází routy, dává context, první matchne
https://channel9.msdn.com/Events/Ignite/2016/BRK2192-TS - pdb - je jiné pro linux - type: platform - u .netu v project.json, říká že chceme shared mode - nekopíruje dll frameworku - vylepšení v csproj - *.cs místo vyjmenování - vs code vždy si nainstalovat c sharp extension, má nějaký terminal tam jde psat dotnet new atd..
EF Core https://channel9.msdn.com/Events/Ignite/2016/BRK2184 - normálně model context, connection string a provider určit v OnConfiguring - v dbcontext - db.database.ensurecreated - vytvoří podle modelu, vhodné pro prototyp, pro změny migration - omezení modelu - anotace nebo fluent api v onmodelcreating - jak sestavit model - z classes + dbset - model ten se pošle do onmodelcreating, v ef6 - onmodelcreating nedostane model - universal windows app - v release je .net native, ef zatím moc nepaří - ef 1.1 - soustředění na umožnění normálního používání, zjednodušení registrování repalce service - např custom mapper do db - mapování na fieldy- v onmodelcreating registrování, defaultně podle konvencí, lze i určit jméno backing field, normálně jen get a set properties - memory optimized tables - příklad hodně dotazů a změna na hodně indexované tabulce
Sql 2016 https://channel9.msdn.com/Events/Ignite/2016/BRK3043-TS - NUMA Non-Uniform Memory Access - skalovatelnost, seskupuje procesory a pamet do samostatnych uzlu ktere pracuji zvlast - v sql limit 8, nyní rozdělené po 8, optimalizace - dvě logické cpu nejsou nejsou na stejném node - zlepšení práce s pamětí - sdílená paměť problém při více cpu - insert in parallel, např zrychlení obnovy ze zálohy - tempdb více souborů - 8 - nvdimm - rychlejší io zápis logu
0 notes
Text
Optimizing SQL Server Performance: Tackling High Forwarded Fetches in TempDB and Heaps
Diving into the world of SQL Server, we often bump into a little hiccup known as “Forwarded Fetches/sec,” especially when we’re dealing with TempDB and tables that are just heaps of data. Imagine every time you try to update a row, it decides to play musical chairs and move to a new spot. This not only makes it harder to find but also slows everything down because it needs extra effort to be…
View On WordPress
#Forwarded Fetches solution#Heap table management#SQL Server performance#T-SQL Code Examples#TempDB optimization#TempExample
0 notes
Text
Amazon RDS for SQL Server now supports SQL Server 2019
Amazon RDS for SQL Server now supports Microsoft SQL Server 2019 for Express, Web, Standard, and Enterprise Editions. You can use SQL Server 2019 features such as Accelerated Database Recovery, Intelligent Query Processing, Intelligent Performance, Monitoring improvements, and Resumable Online Index creations. The purpose of this post is to: Summarize the new features in SQL Server 2019 that are supported in Amazon RDS for SQL Server Explain when and how the compatibility level of a database is set Describe changes to tempdb default configuration Review a few caveats with respect to some of the new features New Features Amazon RDS for SQL Server 2019 supports the following new features: Accelerated database recovery (ADR) improves database availability by reducing crash recovery time. ADR also allows for instantaneous transaction rollback and aggressive transaction log truncation, even in the presence of active long-running transactions. Intelligent query processing (IQP) features such as: Row mode memory grant feedback to automatically correct excessive memory grants based on real execution statistics. Row mode memory grant feedback is an extension to the batch mode memory grant feedback feature in previous version of SQL Server . This feature fine-tunes the memory grant sizes for both batch and row mode operator. Batch mode runs on rowstore, without requiring column store indexes. Scalar User Defined Functions (UDF) Inlining to automatically transform UDFs into scalar expressions or scalar subqueries. Table variable deferred compilation, to defer the compilation of a statement that references a table variable until the first actual use of the statement, resulting in actual cardinality use. Approximate counts with APPROX_COUNT_DISTINCT to return the approximate number of unique non-null values in a group without having to scan the entire table. Interleaved implementation for multi-statement table-valued functions to pause the optimization until the applicable subtree runs and accurate cardinality estimates are received. Memory-optimized tempdb metadata improves scalability of tempdb-heavy workloads by moving system tables managing temporary table metadata into latch-free, non-durable, memory-optimized tables. Intelligent Performance features such as: OPTIMIZE_FOR_SEQUENTIAL_KEY for index creation, which improves the throughput for high-concurrency inserts into an index. Forcing fast forward and static cursors provides Query Store plan forcing support for fast forward and static cursors. Indirect checkpoint scalability improvements to help DML-heavy workloads. Reduced recompilations for workloads running DML on temporary tables created by an outer scope batch. Concurrent Page Free Space (PFS) updates by using a shared latch instead of an exclusive latch. Scheduler worker migration enables the migration of long-running tasks across schedulers on the same NUMA node to provide balanced CPU usage. Monitoring improvements such as: A new wait type, WAIT_ON_SYNC_STATISTICS_REFRESH shows accumulated instance-level time spent on synchronous statistics refresh operations. LIGHTWEIGHT_QUERY_PROFILING to reduce the overhead of capturing performance data. COMMAND column of dm_exec_requests to show “SELECT (STATMAN)” for tasks waiting on a synchronous statistics update. Dynamic Management Function (DMF) dm_exec_query_plan_stats returns the last known actual query plan when LAST_QUERY_PLAN_STATS database configuration is enabled. DMF dm_db_page_info returns information about a database page. Mission-critical security features such as: Data Discovery & Classification to facilitate classifying and labeling columns basing on their data content. SQL Server Audit enhancements to view the new data_sensitivity_information column in the Audit Log. Transparent Data Encryption (TDE) is now also available on Standard Edition. The data truncation error message defaults to include table and column names, and the truncated value. Prior to SQL Server 2019, only resumable online index rebuild was supported. Resumable online index creations are also now supported. For more details, review the Guidelines for online index operations. Provisioning a SQL Server 2019 DB instance You can provision a SQL Server 2019 DB instance on Amazon RDS for SQL Server two different ways: Create a new RDS DB instance with the engine version = 15.00 Upgrade an existing DB instance to engine version = 15.00 Amazon RDS for SQL Server supports upgrading directly to SQL Server 2019 from all supported versions. The oldest supported engine version is SQL Server 2012 (engine version 11.00). We highly recommend testing database workloads on the new engine version prior to upgrading the DB instances. Amazon RDS for SQL Server makes this easy to do. Simply take a snapshot of the DB instance, restore the snapshot as a test DB instance, and upgrade the test DB instance to the new engine version. When the testing is complete, you can stop the test DB instance. For more information about testing and upgrading to new major versions, see Best practices for upgrading SQL Server 2008 R2 to SQL Server 2016 on Amazon RDS for SQL Server. You can provision a SQL Server 2019 DB instance on Amazon RDS for SQL Server by using the AWS Management Console, AWS Command Line Interface (AWS CLI), AWS SDK, or AWS CloudFormation. While provisioning the DB instance, the engine version needs to be set to 15.00. Compatibility level The compatibility level defines the Transact SQL (T-SQL) and query processing behavior in SQL Server. For more information, see ALTER DATABASE (Transact-SQL) Compatibility Level. The compatibility level is set at the database level and the native compatibility level of a newly created database on SQL Server 2019 is 150. Irrespective of the provisioning method (creating a new DB instance or upgrading an existing DB instance), a newly created database on an RDS SQL Server 2019 DB instance has a compatibility level of 150 by default. On an upgraded RDS SQL Server 2019 DB instance, existing databases that were created on older engine versions prior to the engine version upgrade remain on the older compatibility level. For example, if an RDS SQL Server 2017 DB instance was upgraded to SQL Server 2019, prior to the upgrade, databases created on SQL Server 2017 had a compatibility level of 140. These databases continue to have a compatibility level of 140 even after the upgrade. However, after the upgrade, you can change the compatibility level using the ALTER DATABASE T-SQL command: alter database set compatibility_level=150 SQL Server Management Studio (SSMS) provides an option to change the compatibility mode via the SSMS graphical user interface (GUI). This requires elevated privileges that aren’t available in Amazon RDS, so you can’t change the compatibility level using the SSMS GUI. Instead, use the T-SQL command to change the compatibility level. Changes to tempdb In Amazon RDS for SQL Server, starting with SQL Server 2019, the number of tempdb data files created by default has changed. Prior to SQL Server 2019, an RDS SQL Server instance had one tempdb data file across all editions and instance sizes. With SQL Server 2019, a newly created RDS SQL Server 2019 DB instance uses the following mapping for deciding how many tempdb data files get created. Edition Instance Class Size Number of TempDB Data Files Express All 1 Enterprise/Standard and Web db.*.xlarge and below Number of vCPUs Enterprise/Standard and Web db.*.2xlarge and above 8 The number of tempdb data files are decided during the creation of the DB instance. Post-creation, scaling a DB instance up or down doesn’t change the number of tempdb data files. For example, a newly created Standard Edition db.m5.xlarge DB instance has four tempdb datafiles. Scaling the instance to a db.m5.2xlarge doesn’t increase the number of tempdb files to eight. Using the new Amazon RDS for SQL Server features You can enable and use most of the new features as described in the SQL Server documentation, but there are a few exceptions. Multi-AZ deployments Multi-AZ deployments in Amazon RDS for SQL Server 2019 use one of two modes for synchronous replication: Always On or database mirroring, depending on the edition and upgrade path. Keep in mind the following: A newly created Multi-AZ RDS SQL Server 2019 Enterprise Edition (EE) DB instance uses Always On. Enabling Multi-AZ on a newly created Single-AZ RDS SQL Server 2019 EE DB instance uses Always On. Enabling Multi-AZ on a Single-AZ RDS SQL Server 2019 EE DB instance that was upgraded from any older engine version or edition uses Always On. A Multi-AZ DB instance upgraded from an older engine version to SQL Server 2019 uses the same mode it used on the older engine version. All Standard Edition DB instances use database mirroring. To check if a Multi-AZ DB instance is using Always On or database mirroring, on the Amazon RDS console, choose the database and navigate to its Configuration tab. On the Configuration tab, look for Multi AZ. For a Multi-AZ DB instance using Always On, the setting shows as Yes (Always On). For a DB Multi-AZ instance using database mirroring only, the setting shows as just Yes. To check using the AWS CLI or the AWS SDK, look for the ListenerEndpoint. Multi-AZ DB instances using database mirroring only have one endpoint. An additional ListenerEndpoint exists for Multi-AZ DB instances using Always On. You can change a Multi-AZ RDS SQL Server 2019 EE DB instance using database mirroring to use Always On by converting the DB instance to Single-AZ and then re-enabling Multi-AZ. Accelerated database recovery ADR is a SQL database engine feature that greatly improves database availability, especially in the presence of long running transactions, by redesigning the SQL database engine recovery. ADR achieves fast database recovery by versioning database modifications and only undoing logical operations, which are limited and can be undone almost instantly. Any transactions that were active at the time of a crash are marked as stopped and therefore concurrent user queries can ignore any versions generated by these transactions. For more information, see Accelerated database recovery. In Amazon RDS for SQL Server, ADR is fully supported on Single-AZ instances. On a Multi-AZ instances, ADR is supported on instances using Always On and is not supported on instances using database mirroring. As indicated in this bugfix, ADR is incompatible with database mirroring and trying to enable ADR on a mirrored database results in an error: Msg 1484, Level 16, State 1, Line LineNumber Database Mirroring cannot be set for database 'ADR_Mirroring' because the database has Accelerated Database Recovery enabled or there are still versions in the Persisted Version Store. If Accelerated Database Recovery is disabled, please run sys.sp_persistent_version_cleanup '' to clean up previous versions. On a Multi-AZ DB instance using database mirroring, enabling ADR on a newly created database results in Amazon RDS automation disabling ADR and enabling database mirroring. When enabling Multi-AZ on a DB instance wherein the mode is database mirroring, if ADR enabled databases are found, enabling Multi-AZ fails and the following notification appears: Unable to convert the DB instance to Multi-AZ: The database(s) ‘’ prevented the conversion because they have Accelerated Database Recovery (ADR) enabled. Disable ADR for these databases and try again. Intelligent query processing All IQP features in SQL Server 2019 are supported in Amazon RDS for SQL Server. Apart from the Approximate Count Distinct feature, you need to enable all the IQP features at the database level using the following command: alter database scoped configuration set =on You can also enable some of these features on tempdb, and the Amazon RDS primary user has the permissions to do so. On Multi-AZ DB instances, enabling these features on tempdb needs to be done on the primary and secondary. This can be achieved in two ways: Enable the feature on the primary, reboot the DB instance with failover, and enable the feature on the new primary Convert the Multi-AZ DB instance to Single-AZ, enable the feature, and convert the DB instance to Multi-AZ In-Memory database Amazon RDS for SQL Server doesn’t support persistent memory (PMEM) devices and SQL Server native database snapshots. So, the enhancement to Hybrid Buffer Pool to use PMEM devices and In-Memory OLTP support for SQL Server native database snapshots are not supported. The memory-optimized tempdb metadata feature is supported in Amazon RDS for SQL Server. You can enable this feature by running the alter server configuration command. However, the Amazon RDS primary user doesn’t have access to run this command on an RDS SQL Server DB instance. Instead, you can set the parameter “Memory optimized tempdb Metadata” in the Amazon RDS parameter group. After applying the parameter group with the modified parameter to the DB instance, the feature is enabled on the DB instance. Intelligent Performance As part of Intelligent Performance, SQL Server 2019 brings some enhancements to Resource Governance. Given that Amazon RDS for SQL Server doesn’t support SQL Server’s Resource Governor feature, these enhancements are not supported. All other Intelligent Performance features like concurrent PFS updates, scheduler worker migration, and more, are supported in Amazon RDS for SQL Server. Mission-critical security Data Discovery & Classification introduces a new tool built into SSMS for discovering, classifying, labeling, and reporting sensitive data in databases. For more information, see SQL Data Discovery and Classification. Using SSMS version 17.5 and above, Data Discovery & Classification is achievable on Amazon RDS for SQL Server. You can also add data sensitivity labeling using the ADD SENSITIVITY CLASSIFICATION clause, and the Amazon RDS primary user has the necessary permissions to run this command. The data sensitivity information has been added to the SQL Server Audit file record under the new field data_sensitivity_information. You can enable SQL Server auditing in Amazon RDS for SQL Server using options groups. After the SQL Server Audit is enabled on the DB instance and audit specifications are created, you can read the Audit files on the DB instance using the function msdb.dbo.rds_fn_get_audit_file. This function also returns the new field data_sensitivity_information. You can read the audit files as long as they are on the disk. To change how long the audit files should be persisted on the disk, you can configure the parameter RETENTION_TIME while setting up the SQL Server Audit option. Amazon RDS for SQL Server now supports TDE for SQL Server Standard Edition. TDE needs be enabled on the DB instance using option groups. For more information about enabling TDE, see Support for Transparent Data Encryption in SQL Server. Conclusion In this post, we listed some of the new and exciting features of SQL Server 2019 that are supported in Amazon RDS for SQL Server, along with brief descriptions of the features. We called out cases where the features differ slightly, provided instructions on how to enable the features, and advised on any prerequisites they might have. A major engine version release like SQL Server 2019 brings significant changes to the engine—some visible and others not. We highly recommend testing database workloads using the Amazon RDS easy clone mechanisms as described in this post before upgrading to this new engine version. About the Author Prashant Bondada is a Senior Database Engineer at Amazon Web Services. He works on the RDS team, focusing on commercial database engines, SQL Server and Oracle. Sudarshan Roy is a Senior Database Specialist Cloud Solution Architect with the AWS Database Services Organization (DBSO), Customer Advisory Team (CAT). He has led large scale Database Migration & Modernization engagements for Enterprise Customers to move their on-premises database environment to Multi Cloud based database solutions. https://aws.amazon.com/blogs/database/amazon-rds-for-sql-server-now-supports-sql-server-2019/
0 notes
Link
In various scenarios, DBAs need to write T-SQL queries to check numerous states of their respected SQL Server instances. These queries can be run separately or with a fairly large amount of time invested in optimizing and modifying each one to run as a single power-query that will check a variety of conditions. On top of the time invested in creating such a script, additional time will be required to modify it and add new checks which can cause the whole script to break. To address this concern comes ApexSQL Manage. In addition to default rules incorporated in the tool for SQL Server best practices and health checks and predefined FixSQL queries, there is also an option to create custom rules with user-defined FixSQL that can be run if the rule result indicates an issue. Creating custom rules allows for a variety of health check scenarios that can be tailored to meet specific user environments. The main benefit of this kind of SQL Server instance management is centralization for each instance. Health check rules can be applied on multiple instances and results can be shown for all or individual SQL Server instances:
Behind the scenes
The majority of pre-written rules in ApexSQL Manage are using SQL Server Management Objects (SMO) to gather information on the SQL Server instance. SMO is a collection of objects that are designed by Microsoft for programmatic management of SQL Server instance. SMO is used to build customized SQL Server management applications and is a cornerstone for ApexSQL Manage. Properties gathered on the SQL Server state through SMO are used by the tool to cross-reference the received information with the SQL Server best practices. To the receiving end the user is shown the end result in ApexSQL Manage as Pass or Fail, depending on the SQL Server state, as well as advice on how to remedy the detected issue or a T-SQL script which can be executed from the tool.
Detailed information on SQL Server Management Objects, how it works, and which classes and properties can be used to further customize rules in ApexSQL Manage can be found in the following Microsoft documentation:
Overview (SMO)
SMO Object Model Diagram
Information Class
SERVERPROPERTY (Transact-SQL)
How to write custom rules
To write custom rules in ApexSQL Manage, go to the Health tab and click the Manage button. This will open the Rule management window:
Once here, click on the Add button to open the Create new rule window.
In the Details tab, several fields require user side input.
Name – The name of the rule
Description – Brief or detailed description of what the purpose of the rule is
Object type – Object type can be set to Server or Database. From the coding standpoint, it doesn’t matter whether the Server or Database is selected as Object type. The only reason to use Database as Object type is clearer grouping of rules. It is recommended to always use the Server as the Object type.
Category – Category this rule is best suited for. Detailed information on available categories can be found in How to perform health checks on SQL Server instances with ApexSQL Manage article
Language – Language in which the rule was written. Supported languages are C# and Visual Basic
For this example, a custom rule will be created to check if the recovery model for all databases on a SQL Server instance is set to FULL recovery.
Object type is set to Server, Category is set to Databases and selected language is C#:
Next, proceed to the Condition tab. This is where custom rules can be specified e.g. the code that will check various user-specified conditions. In this example, a condition to check if the Recovery model is set to FULL will be used. Details regarding this condition can be found in Example 1:
Once the condition has been set, go to the Violation tab. This tab provides options for specifying the level of Severity and Advice for the rule.
Severity can be set to:
High
Medium
Low
Since these are all user-specified areas, it is up to the user to determine the severity level and appropriate advice for the detected issue. For this example, the Severity will be set to High and Advice will be to Set database to Full Recovery model:
When the severity level and advice have been specified, go to the SQL Server tab. This tab is used to specify the version of the SQL Server instance against which the rule will be executed. The outcome when the rule is executed is depended on the type of rule and differences between different versions of SQL Servers. If a custom rule is executed without specifying any SQL Server version, the outcome will show no results. This also applies to the scenario when the rule is executed without specifying the correct SQL Server version. For this example, all SQL Server versions will be checked. Click on the OK button to create the rule:
Once the rule has been created, it will be shown in the appropriate category. All user-created rules are colored dark red for easier management:
Clarification and examples of custom rules
As mentioned previously, ApexSQL Manage is using SQL Server Management Objects (SMO) for rule execution. All rules are executed based on ActiveObject to which an SMO object is attributed.
ActiveObject is what governs the rule execution and it can be:
Server – when the rule applies to the instance level
Database – when the rule applies to the database level
Quick tip:
ApexSQL Manage is a server management tool and as such the primary focus of the tool is at the server level. Executing custom rules for single or specific databases is not recommended.
The following examples will provide detailed information on how a condition can be written and executed in ApexSQL Manage.
Example 1:
When the rule is executed it goes through a verification process to check if certain conditions (specified by the user) have been met.
In this example, the rule is going to use SMO to check if the recovery model of a single database is set to full.
DatabaseOptions is a SQL Server Management Object class and RecoveryModel is the property of the class. This property is stored in ActiveObject and is used by the tool to check the condition:
--WARNING! ERRORS ENCOUNTERED DURING SQL PARSING! // If recovery model is not Full - Best practice is to set RecoveryModel to Full if(ActiveObject.DatabaseOptions.RecoveryModel != RecoveryModel.Full)
It is important to note, the aforementioned code is written as an example only and in this scenario, the rule would apply to only one database, but ApexSQL Manage is primarily intended to work with the whole SQL Server instance and as such it is not possible to select only one database.
In a scenario where the condition is not met (e.g. not in accordance with best practice) RaiseViolation (); can be initiated as a signal that a discrepancy with best practice has been found.
As a response to the discrepancy, it is possible to add a FixSQL – which is a query that will be offered to the user as an option to bring the situation in line with best practice.
For this particular scenario, the whole code would go as following:
if(ActiveObject.DatabaseOptions.RecoveryModel != RecoveryModel.Full) { FixSQL = string.Format("ALTER DATABASE [{0}] SET RECOVERY FULL", ActiveObject.Name); RaiseViolation(); }
Running this code will only give results for the first database on the selected SQL Server instance. To encompass all databases on a SQL Server instance it is required to expand this code further. The best approach is to check if all databases meet the requirements e.g. if the database recovery model is set to FULL. Condition for a custom rule that will apply to all databases is as follows:
List<string> databasesRecovery = new List<string>(); bool errorExists = false; System.Text.StringBuilder sb = new System.Text.StringBuilder(); foreach (var database in ActiveObject.Server.Databases.Where(x => x.DatabaseOptions.RecoveryModel != RecoveryModel.Full)) { databasesRecovery.Add(database.Name); } if (databasesRecovery.Count() > 0) { foreach (string database in databasesRecovery) { sb.AppendFormat(string.Format(@"ALTER DATABASE [{0}] SET RECOVERY FULL;", database)); sb.AppendLine("\nGO\n"); errorExists = true; } if (errorExists) { FixSQL = sb.ToString(); RaiseViolation(); } }
FixSQL that would be presented to the user in this scenario would look like this:
ALTER DATABASE [AdventureWorksDW] SET RECOVERY FULL; GO ALTER DATABASE [master] SET RECOVERY FULL; GO ALTER DATABASE [msdb] SET RECOVERY FULL; GO ALTER DATABASE [tempdb] SET RECOVERY FULL; GO ALTER DATABASE [WideWorldImporters] SET RECOVERY FULL; GO
By adding this piece of code:
... if(!database.IsSystemObject) { databasesRecovery.Add(database.Name); } ...
Instead of:
databasesRecovery.Add(database.Name);
FixSQL would not contain system databases and would read as follows:
ALTER DATABASE [AdventureWorksDW] SET RECOVERY FULL; GO ALTER DATABASE [WideWorldImporters] SET RECOVERY FULL; GO
In a scenario when Database is selected as the Object type, the first database is taken from the SQL Server instance to read the server data.
ActiveObject would be the database and the list of all databases on the server would be obtained as ActiveObject.Server.Databases
In a scenario when Server is selected as the Object type, a list of all databases on the SQL Server instance would be obtained as ActiveObject.Server.Databases (as in the scenario with Database as Object type) or shorten ActiveObject.Databases. ActiveObject.Server is an SMO object that is supplemented with additional properties from ApexSQL Manage. To reduce the possibility of error in the code it is recommended to use ActiveObject.Server.Databases.
Example 2:
There are also simple SQL Server instance checks that can only offer advice instead of a specific query to fix the detected issue because it is not possible to write a query for these types of scenarios. Scenarios, where it is not possible to write a query are the ones that require intervention from the user side, for example: hardware limitations, weak passwords, locations of filegroups, etc.
In this example, the rule is going to check the response time of TempDB. If the response time is under 20ms, the rule result is considered as Pass. If the response time is greater, the advice is to check the performance for selected SQL Server instance:
//This rule demonstrates how to check whether the response time (writing and reading) TempDB is no greater than 20 ms var Time = ActiveObject.Server.Databases.Tempdb.AvgResponseTime.Values.ToList(); var writeTime = Time[0]; var readTime = Time[1]; if(writeTime > 20 || readTime > 20) { FixSQL = "Response time for TempDB is greater than 20 ms, check SQL Server performance"; RaiseViolation(); }
In this scenario, FixSQL serves to advise the user on how to correct this issue.
Example 3:
Not all rules are written to use SMO properties. Due to the limitations of the data that can be obtained from the SMO, several special queries are used to obtain the desired data. This feature is not enabled for users, but these checks can be found in default rules.
For example, the rule for checking free hard drive space is using the property HddSpace to collect the data on total and free space on hard-drive.
--WARNING! ERRORS ENCOUNTERED DURING SQL PARSING! public List<string> HddSpace { get { using (SqlConnection cnn = new SqlConnection(ConnectionString)) { string querry = @"SELECT distinct(volume_mount_point), total_bytes/1048576 as Size_in_MB, available_bytes/1048576 as Free_in_MB FROM sys.master_files AS f CROSS APPLY sys.dm_os_volume_stats(f.database_id, f.file_id) group by volume_mount_point, total_bytes/1048576, available_bytes/1048576 order by 1"; cnn.Open(); SqlCommand command = new SqlCommand(querry, cnn); SqlDataReader reader = command.ExecuteReader(); List<string> list = new List<string>(); while (reader.Read()) { list.Add(reader[1].ToString()); list.Add(reader[2].ToString()); } return list; } } }
The rule checks if there is less than 20% free space on the HDD. If it is less than 20%, the rule is FAIL and advice is given:
long hddSpace = Convert.ToInt64(ActiveObject.Server.freeHD [0]); long hddFreeSpace = Convert.ToInt64(ActiveObject.Server.freeHD [1]); if(((hddFreeSpace * 100) / hddSpace) < 20) { FixSQL = "Free disk space is approaching the 20%, after it may affect SQL Server performance"; RaiseViolation(); }
Summary
In summary, instead of executing a large number of scripts multiple times to check the state of SQL Server instances, custom rules written in ApexSQL Manage provide a faster and centralized approach of SQL Server management where all managed instances can be monitored and detected issues addressed from a single point.
0 notes
Link
Introduction
SQL Server maintenance is not a one-time event, but rather a part of a continuous process. Apart from regular backups and integrity checks, performance improvements can be achieved with index maintenance. If done at regular intervals, it can free the server to focus on other requests rather than losing time scanning for fragmented indexes.
This article should serve as a guide as to how to automate and schedule SQL Server index defragmentation, and will cover three different ways of doing it:
Automate and schedule SQL Server index defragmentation using SQL Server maintenance plans
Automate and schedule SQL Server index defragmentation using SQL Server Agent jobs
Automate and schedule SQL Server index defragmentation using ApexSQL Defrag
Automate and schedule SQL Server index defragmentation using maintenance plans
Maintenance plans in SQL Server are a good way to automate some of the routine tasks. In this section will be explained how to automate and schedule SQL Server index defragmentation using maintenance plans.
To do that, first we need to open up SQL Server Management Studio.
When SSMS is opened, we need to go to Management and then right-click on Maintenance Plans and select Maintenance Plan Wizard
After the wizard opens, go to Next to go to the next page
Once there, enter the maintenance plan name, optionally enter the description, select whether to have a separate schedule for each task or single schedule for the entire plan or no schedule (for the purposes of this article, we are going to select the single schedule) and click on Change to edit the schedule
In the New Job Schedule, setup the schedule as per your individual needs.
For the schedule type, there are a few options – Start automatically when SQL Server Agent starts, Start whenever CPUs become idle, Recurring and One time. For the purpose of this article, Recurring is chosen since it allows to schedule precise time when to start the job.
The Frequency option allows choosing whether to do the job on a daily, weekly or monthly basis. In this case, Weekly is chosen since it allows to run the job on certain days of the week which can be beneficial by allowing the user to select the days with the least amount of traffic on the server.
Daily frequency allows to select a specific time of day to run the job, or a selected time span in which the job runs on an hourly basis.
Duration is used to choose on which day to start the job and optionally to specify the end date, after which the job will not run anymore
Moving on to the next page of the wizard, select the maintenance tasks. For the scope of this article, Reorganize Index and Rebuild Index tasks are chosen
The Select Maintenance Task Order page appears when there’s more than one task chosen. The order is made in this page.
Users can also make a separate maintenance plan for the reorganization of indexes as well as for the rebuilding of indexes, if needed.
On the next wizard page, Define Reorganize Index Task is where databases can be selected, as well as defining the Scan type and thresholds for the optimization in the Index Stats Options, such as fragmentation percentage, page count and the last time used
On the following wizard page, Define Rebuild Index Task, databases are selected
Free space options, the free space per page, or Fill factor, can be left as default values or changed (doing this changes the free space per page for all the indexes in the selected databases, which in some cases can be detrimental to the overall performance and fragmentation, despite the rebuild process)
Advanced options offer different options, such as sorting the results in tempdb, online index rebuild, maximum degree of parallelism among others.
Index Stats Options allows defining the thresholds and scan type
In the next wizard page, Select Report Options, it can be chosen to write a report to a text file, and/or send an email report
In the final page of the wizard the whole maintenance plan with all the tasks can be reviewed and created by pressing on the finish button
After pressing on the Finish button, the maintenance plan is being created and is presented at the end of the wizard as a series of operations, which, if successful, should look like in the image below
Automate and schedule SQL Server index defragmentation using a SQL Server Agent job
As well as maintenance plans, SQL Server Agent jobs are also a handy way to automate and schedule index defragmentation jobs in SQL Server. They are also configured from SSMS
To create a new job, right click on SQL Server Agent, select New and then Job
Next the New Job window will open. In it, enter the Job name, owner, optionally Category and Description
In the next tab, Steps, click on New to open a New Job Step window
In the New Job Step, insert the Step Name, select the type of step to be Transact-SQL script (T-SQL), select the database to defragment
Note: For SQL Server Agent job steps, only one database can be selected in a single step
In the Command: window, enter the following T-SQL script which was taken and adapted from MSDN Books Online article “Rebuild or reorganize indexes (with configuration)” :
USE <databasename> SET NOCOUNT ON DECLARE @reorg_frag_thresh float SET @reorg_frag_thresh = 10.0 DECLARE @rebuild_frag_thresh float SET @rebuild_frag_thresh = 30.0 DECLARE @fill_factor tinyint SET @fill_factor = 80 DECLARE @report_only bit SET @report_only = 1 -- added (DS) : page_count_thresh is used to check how many pages the current table uses DECLARE @page_count_thresh smallint SET @page_count_thresh = 1000 -- Variables required for processing. DECLARE @objectid int DECLARE @indexid int DECLARE @partitioncount bigint DECLARE @schemaname nvarchar(130) DECLARE @objectname nvarchar(130) DECLARE @indexname nvarchar(130) DECLARE @partitionnum bigint DECLARE @partitions bigint DECLARE @frag float DECLARE @page_count int DECLARE @command nvarchar(4000) DECLARE @intentions nvarchar(4000) DECLARE @table_var TABLE( objectid int, indexid int, partitionnum int, frag float, page_count int ) -- Conditionally select tables and indexes from the -- sys.dm_db_index_physical_stats function and -- convert object and index IDs to names. INSERT INTO @table_var SELECT [object_id] AS objectid, [index_id] AS indexid, [partition_number] AS partitionnum, [avg_fragmentation_in_percent] AS frag, [page_count] AS page_count FROM sys.dm_db_index_physical_stats (DB_ID(), NULL, NULL , NULL, 'LIMITED') WHERE [avg_fragmentation_in_percent] > @reorg_frag_thresh AND page_count > @page_count_thresh AND index_id > 0 -- Declare the cursor for the list of partitions to be processed. DECLARE partitions CURSOR FOR SELECT * FROM @table_var -- Open the cursor. OPEN partitions -- Loop through the partitions. WHILE (1=1) BEGIN FETCH NEXT FROM partitions INTO @objectid, @indexid, @partitionnum, @frag, @page_count IF @@FETCH_STATUS < 0 BREAK SELECT @objectname = QUOTENAME(o.[name]), @schemaname = QUOTENAME(s.[name]) FROM sys.objects AS o WITH (NOLOCK) JOIN sys.schemas as s WITH (NOLOCK) ON s.[schema_id] = o.[schema_id] WHERE o.[object_id] = @objectid SELECT @indexname = QUOTENAME([name]) FROM sys.indexes WITH (NOLOCK) WHERE [object_id] = @objectid AND [index_id] = @indexid SELECT @partitioncount = count (*) FROM sys.partitions WITH (NOLOCK) WHERE [object_id] = @objectid AND [index_id] = @indexid -- Build the required statement dynamically based on options and index stats. SET @intentions = @schemaname + N'.' + @objectname + N'.' + @indexname + N':' + CHAR(13) + CHAR(10) SET @intentions = REPLACE(SPACE(LEN(@intentions)), ' ', '=') + CHAR(13) + CHAR(10) + @intentions SET @intentions = @intentions + N' FRAGMENTATION: ' + CAST(@frag AS nvarchar) + N'%' + CHAR(13) + CHAR(10) + N' PAGE COUNT: ' + CAST(@page_count AS nvarchar) + CHAR(13) + CHAR(10) IF @frag < @rebuild_frag_thresh BEGIN SET @intentions = @intentions + N' OPERATION: REORGANIZE' + CHAR(13) + CHAR(10) SET @command = N'ALTER INDEX ' + @indexname + N' ON ' + @schemaname + N'.' + @objectname + N' REORGANIZE; ' + N' UPDATE STATISTICS ' + @schemaname + N'.' + @objectname + N' ' + @indexname + ';' END IF @frag >= @rebuild_frag_thresh BEGIN SET @intentions = @intentions + N' OPERATION: REBUILD' + CHAR(13) + CHAR(10) SET @command = N'ALTER INDEX ' + @indexname + N' ON ' + @schemaname + N'.' + @objectname + N' REBUILD' END IF @partitioncount > 1 BEGIN SET @intentions = @intentions + N' PARTITION: ' + CAST(@partitionnum AS nvarchar(10)) + CHAR(13) + CHAR(10) SET @command = @command + N' PARTITION=' + CAST(@partitionnum AS nvarchar(10)) END IF @frag >= @rebuild_frag_thresh AND @fill_factor > 0 AND @fill_factor < 100 BEGIN SET @intentions = @intentions + N' FILL FACTOR: ' + CAST(@fill_factor AS nvarchar) + CHAR(13) + CHAR(10) SET @command = @command + N' WITH (FILLFACTOR = ' + CAST(@fill_factor AS nvarchar) + ')' END -- Execute determined operation, or report intentions IF @report_only = 0 BEGIN SET @intentions = @intentions + N' EXECUTING: ' + @command PRINT @intentions EXEC (@command) END ELSE BEGIN PRINT @intentions END PRINT @command END -- Close and deallocate the cursor. CLOSE partitions DEALLOCATE partitions GO
Note: Make sure to enter the database name in the first line of the script according to the environment in which the job will be used
In the advanced tab of the same window, action on success, action on failure can be set from the dropdown menus, as well as the ability to export the script to a file, log the action to table and include the step output in history
After creating the step, the New Job window should look something like this
On the next tab, Schedules, click on New… to open the New Job Schedule
In the New Job Schedule, same as when creating the schedule for maintenance plans, a detailed schedule can be set up
After creating the schedule, the New Job window should look as follows
On the Alerts tab, alerts can be setup in case of specific events
On the Notifications tab, email notifications, pager messages can be sent, an entry in the Windows Application event log can be made and the job can be deleted automatically upon success or failure
After pressing OK, the job will be created, and can afterwards be viewed in the Object Explorer under the SQL Server Agent – Jobs
Automate and schedule SQL Server index defragmentation using ApexSQL Defrag
Another way to automate and schedule SQL Server index defragmentation is by using a 3rd party tool such as ApexSQL Defrag. ApexSQL Defrag is an enterprise SQL Server tool which is used for monitoring, analyzing and managing SQL Server index defragmentation which works down to a single index level. Spanning across multiple databases and servers, ApexSQL Defrag takes care of reorganizing indexes, rebuilding online or offline, whether the defragmentation process is started manually or is run automatically through a policy
To automate and schedule SQL Server index defragmentation using ApexSQL Defrag, first, download the application from this link and install it
Note: For installation and troubleshooting guide, consult this article
After running ApexSQL Defrag, presented is the main interface of the application
Going to the policies tab, presented is the policy explorer. On the main ribbon, click on Create to start the Policy creation wizard
In the Policy creation wizard, under General tab, insert policy name, optionally a description, rebuild type (online or offline) and setup a schedule
In the same tab, by pressing on the three dots at Targets, a policy targets explorer opens where the indexes can be chosen for maintenance. As it can be seen, targets can be on a different servers, different databases, and can be selected individually. Also, filters for index page number and top % of indexes can be turned on or off and configures in the explorer itself
After selecting the targets, going to Thresholds tab of the policy creation wizard, reorganize and rebuild thresholds can be set using the sliders, limited, sampled and detailed fragmentation scan mode can be chosen, as well as setting the Resources thresholds
In the Notifications tab of the same wizard, email notifications can be set to be sent on success and/or failure of the policy.
Note: SMTP settings need to be set up from the Configuration tab in the main application window to be able to set up email notifications in the policies.
After that, our policy is created and can be run on schedule or started manually from the Policies explorer
On the Policy explorer, operations such as editing, enabling and disabling can be run. Also, policy templates can be used for faster creation of policies with the most common types already predefined in the application itself. All the user needs to do is set up the schedule and select policy targets
As well as creating policies from templates, users can also create their own templates
User created templates can easily be accessed when creating policies from the drop down menu when clicked on Create button in the Policy main ribbon which will automatically load the template settings when creating policies
Downloads
Please download the script(s) associated with this article on our GitHub repository.
Please contact us for any problems or questions with the scripts.
The post How to automate and schedule SQL Server index defragmentation appeared first on Solution center.
0 notes